
The reason I made this site? Well, there are a few things I think
may be interesting for some people out there. By no means I think
this will be the
ultimate ETX-page, but I just want to put some stuff on my own
site. That's why I got this domain anyway...
First, a bit of history. When I was young (about 13) I met a guy in school, who took me to a society of young amateur-astronomers, the JWG. I became hooked, and with the help of my father, we build our own telescope, a 15cm (~6") newton. Unfortunate, due to our inexperience, we didn't use it very much. Part because we lived in a urban area, part because the computer (VIC-20!) began to take our interest.
So did my 'dark years' start (or should I say 'light years'?). My interest in astronomy stayed, but was limited to the news I saw on the TV, or looking up on a starry night, impressing my friends about my knowledge.
Until March 1999. My wife and I went on a small holiday to Tunesia. At the airport, I bought a few magazines to read while lying by the pool. One of the magazines was a 'Sky & Telescope'. An old passion reared its head again....
To make a long story short, I bought a Meade
ETX 125/ec with the AutoStar controller. I chose this telescope
because of the portability, value-for-price and (important) the
GOTO-functionality. I know, it's not very sporty, but hey, it's my
scope.... 8-)
The information provided here is (yet) rather limited. I hope I
will be able to put on some more info, but I hope this will be
enough at the moment.
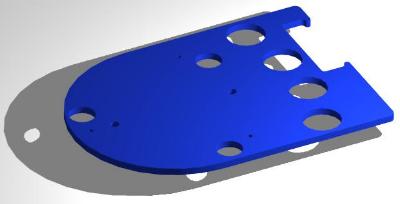 This
is the mounting plate I designed. As you probably know, the mounting
plate for the ETX 125 is put between the smal tripod-head and
the larger plastic base of the telescope, thus preventing the scope
from shaking. This because the plastic telescope-bottom is not as
stiff as the metal head. By supporting the whole base of the scope,
much shaking is prevented. Some people came with the idea of
extending this mounting-plate to get a kind of shelf, where you can
put some eye-pieces or hang the AutoStar on. At Mike
Weasner's site there are a few listed, also Scopetronix
sells one (under 'Tripods & Mounts' -> 'Tripod adapters').
This
is the mounting plate I designed. As you probably know, the mounting
plate for the ETX 125 is put between the smal tripod-head and
the larger plastic base of the telescope, thus preventing the scope
from shaking. This because the plastic telescope-bottom is not as
stiff as the metal head. By supporting the whole base of the scope,
much shaking is prevented. Some people came with the idea of
extending this mounting-plate to get a kind of shelf, where you can
put some eye-pieces or hang the AutoStar on. At Mike
Weasner's site there are a few listed, also Scopetronix
sells one (under 'Tripods & Mounts' -> 'Tripod adapters').
I would be happy to have one of those but the prices are rather high
for me. Living in Austria, the Dollar-exchange-rate is rather
unfavorable at the moment and the shipping costs are also rather
high. (I had to pay 50% more than the US-prices for my ETX125 here
in Austria!)
So, I decided to make one myself. This is not a difficult thing, the
main trouble is the drilling and cutting of the plate. But since I
work in a battery-plant, we have a large workshop with a few skilled
people......
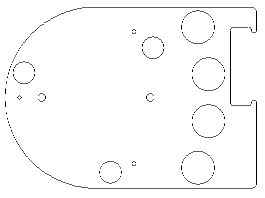
A co-worker of me did the complete drawing in Autocad. First thing
to do was measuring the original plate, to get the holes at the
right place. All these holes don't have to be very precise, beacuse
the are just used to lead some screws through, or the give place for
the three rubber feet of the telescope. After this, we put on a
rectangle containg for holes for eye-pieces and a hold for the
Autostar. This rectangle is faced north, so the eye-pieces are in
mostly in reach when viewing south, and the telescope-connectors
won't be obstructed. Of course, one can add more holes, but this was
enough for me. These four holes have to be rather exact in size, to
prevent the eyepieces of falling through. The eye-piece-holes are
arranged in a half-circle, to leave more place in the corner, making
room for a level-bubble or a compass.
This is the stage the project is in at the moment (5. Nov 2000).
Since it didn't cost me a dime until now, I can't expect to be ready
within a week or so. When it's ready, I'll update this site...
Now there is the question of material. The original plate is made
from 3mm thick steel, another commercially available product from
6mm Aluminium. The thickness is not very important, eventually it
could be made out of wood. Important is to make it real stiff, thus
preventing shaking. Another possibility is my design cut out of
plastic or cardboard, and used in addition to the original plate,
simply by putting the two plates on top of each other. Also, with a
thicker plate (wood or aluminium), be sure that the two mounting
screws are long enough to hold the telescope secure on the tripod.
Next thing will be the cutting. Another co-worker took the drawing
with measurements we made, and tries to ask a friend of him to cut
the plate in 3mm steel with an automatic laser-cutting machine,
using the electronic Autocad data. When that doesn't work, yet
another co-worker already promised me that he can do it during two
or three weeks, using some spare time. Isn't it nice to have some
friends? 8-)
When my plate is ready, I will put the drawing on this website, so
everyone can use it. You may then alter my design, as long as you
don't use it commercially. So producing one or two from this design
is okay, but producing and selling not. See it as a kind of
open-source. Remember, producing one at a commercial workshop is
rather expensive. When you can't produce one by yourself (or your
company 8-) buying at Scopetronix
or other shops is cheaper and easier. They will be better looking
also....
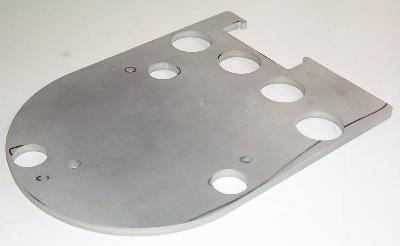 10.dec.
2000: I recieved my plate a few days ago. The cutting was done
with a wire-cutter, programmed by hand, so the AutoCad-file wasn't
used. The cut is very sharp and exact, it looks very good. As you
see in the picture, the plate isn't finished yet, this is what the
raw aluminium looks like. There are even the felt-liner-lines where
the operator made a quick sketch on the plate.... After a quick test
in my living room, I discovered I put the holes for the eyepieces to
close to the scope, so my standard 26mm won't fit in the middle two
holes. I didn't count for the sloping EXT-base, so larger eyepieces
like my 26mm Plössl won't fit. The holes can only be used by small
eyepieces, but I haven't got any (yet), so I can't test it. The
holes are very exactly cut, and with the thickness of 6mm aluminium,
it is impossible to put them tilted in the holes. Bummer. So much
for not trying a paper-cut prototype... 8-(
10.dec.
2000: I recieved my plate a few days ago. The cutting was done
with a wire-cutter, programmed by hand, so the AutoCad-file wasn't
used. The cut is very sharp and exact, it looks very good. As you
see in the picture, the plate isn't finished yet, this is what the
raw aluminium looks like. There are even the felt-liner-lines where
the operator made a quick sketch on the plate.... After a quick test
in my living room, I discovered I put the holes for the eyepieces to
close to the scope, so my standard 26mm won't fit in the middle two
holes. I didn't count for the sloping EXT-base, so larger eyepieces
like my 26mm Plössl won't fit. The holes can only be used by small
eyepieces, but I haven't got any (yet), so I can't test it. The
holes are very exactly cut, and with the thickness of 6mm aluminium,
it is impossible to put them tilted in the holes. Bummer. So much
for not trying a paper-cut prototype... 8-(
I have to bevel the edges, and then think of a nice finish for the
surface. Maybe a sandblasting (we have a sand-blasting machine at
the company) or just a painted surface. I haven't decided yet. But
when I bevel the edges, I'll try to make the inner two
eyepiece-holes also somewhat bigger in one direction, so I can put
in the eyepieces tilted.
Unfortunately, this time is rather busy for me, so I guess I won't
be able to do something until somewhere in january. But when I look
at the sky (the thing that have to lie behind that #&%$* fog), I
guess there will be clouds for the next three months... 8-(
 25.may.
2003: It is a long time, but finally I made it to make the
update and tell about the finished plate. The plate as I finally
recieved it looked like the picture on the left. It has a nice
brushed aluminium look, mainly because it is brushed
aluminium.
25.may.
2003: It is a long time, but finally I made it to make the
update and tell about the finished plate. The plate as I finally
recieved it looked like the picture on the left. It has a nice
brushed aluminium look, mainly because it is brushed
aluminium.
Unfortunately, I miscalculated the design, and put the holes for the
eyepieces to close to the telescope. So I can only use
When there are questions, don't hesitate to contact me.
